NoBige-JackCh3n

copy to my blog

准备

  1. 在手机或PC客户端上登录要删除的账号
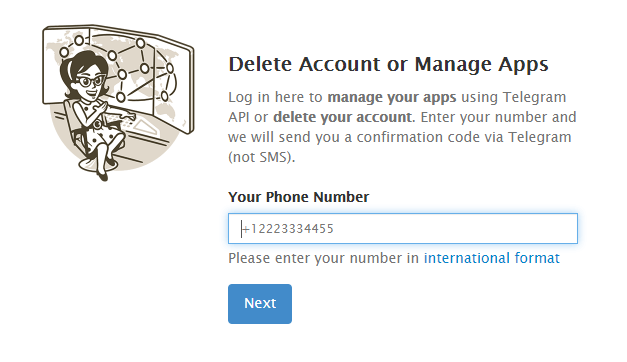
  2. 浏览器打开https://my.telegram.org/auth

删除

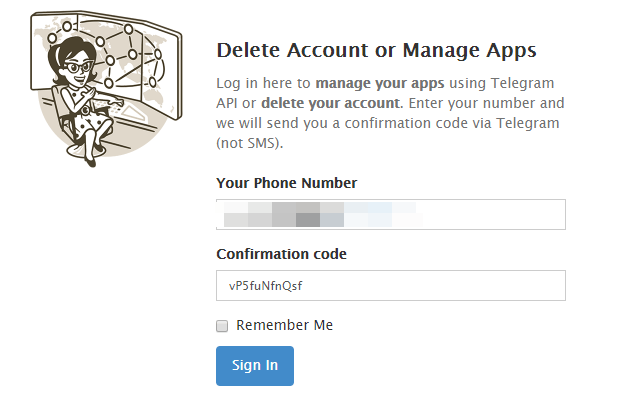
1.登录账号,如手机号+8618888888888

登录账号

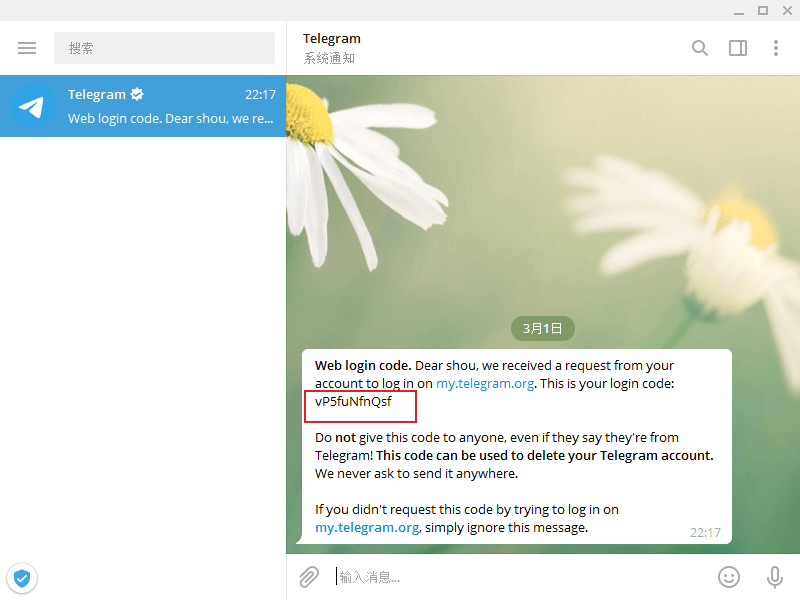
2.输入【客户端】发来的验证码。注意,不是短信!

验证码

验证码

3.登录后点击Delete account

Delete account

4.删除确认,点击Delete My Account

Delete My Account

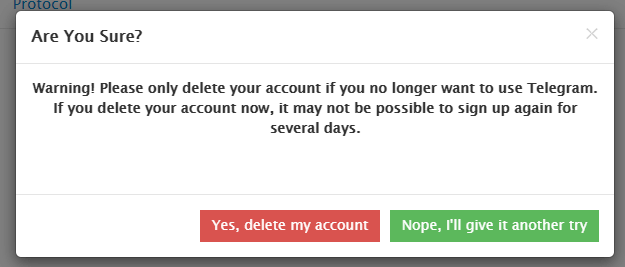
5.二次确认,点击Yes, delete my account

Yes, delete my account

就会弹出以下信息,很快客户端就会被强制退出,即账号被删除成功。

删除消息

问题

Q: How do I delete my account?

If you would like to delete your account, you can do this on the deactivation page. Deleting your account permanently removes all your messages and contacts. All groups and channels that you’ve created are orphaned and left without a creator but admins retain their rights.

This action must be confirmed via your Telegram account and cannot be undone.

We recommend using a non-mobile browser for this process.
Note that you’ll receive the code via Telegram, not SMS.

Q: What happens if I delete my account?

As was just mentioned above, all your data will be flushed from our system: all messages, groups, and contacts associated with your account will be deleted. That said, your contacts will still be able to chat in the groups that you have created, and they will still have their copy of the messages you sent them. So if you want to send messages that can vanish without a trace, try using our self-destruct timer instead.

Termination of a Telegram account is irreversible. If you sign up again, you will appear as a new user and will not get your history, contacts or groups back. People, who have your phone number in their contacts, will be notified. The new user will be displayed as a separate conversation in their messages list and their conversation history with this new user will be empty.

Q: How does account self-destruction work?

Telegram is not a commercial organization, and we value our disk space greatly. If you stop using Telegram and don’t come online for at least six months, your account will be deleted along with all messages, media, contacts and every other piece of data you store in the Telegram cloud. You can change the exact period after which your inactive account will self-destruct in Settings.

参考

基于Github_Isscue的评论插件Gitalk安装

闲着将Next主题升到目前最新的7.7.1,并更换了一些插件,如评论插件,不蒜子统计.

安装Gitalk

Next主题已经内置集成了Gitalk,只需要在Github上创建一个 GitHub Application,然后在主题配置文件中启用并修改配置文件即可.

1.创建 GitHub Application需要 GitHub Application,如果没有 点击这里申请,Authorization callback URL 填写博客域名域名.其他随便填写均可.

GitHub Application

之后会得到Client ID和Client Secret

Client ID

修改主题配置文件,如D:\wwwroot\nobige\themes\next\_config.yml

1
2
3
4
5
6
7
8
9
10
11
12
gitalk:
enable: true
github_id: jackch3n # GitHub 账号id,如我的github主页为https://github.com/JackCh3n id便是:JackCh3n
repo: aiguo_jingye # issues所属的那个仓
client_id: 7uYxGE9VCeQObg0Z1pfF2yiq8RHUwdl6 # GitHub Application Client ID
client_secret: Ta0YwizufyUEHb7mpIjCQ2SV5JvXKo6eOdG1ZqW8rMlBchtLR94DgPAks3NFxn5a # GitHub Application Client Secret
admin_user: jackch3n # 管理员账号,通账号ID即可
distraction_free_mode: true # Facebook-like distraction free mode
# Gitalk's display language depends on user's browser or system environment
# If you want everyone visiting your site to see a uniform language, you can set a force language value
# Available values: en | es-ES | fr | ru | zh-CN | zh-TW
language: en #语言

修改成类似上面的配置就已经可以正常的使用了,如需使用更高级的方法可以参考开发者文档,其js文件在D:\wwwroot\nobige\themes\next\layout\_third-party\comments\gitalk.swig

已知的几个问题,其一每篇文章需要在发布后由管理员手动开启.如下图

管理员开启评论

其二,可能会出现网络问题,暂时没有很好地解决方法.理论上可以用cdn或是反代理的方式来解决问题.

网络错误

不蒜子统计

​ 不蒜子统计更为简单,只需将其false改成true即可.

插件

1
2
3
4
5
6
# 图片处理插件
npm install git+https://github.com/JackCh3n/hexo-asset-image.git
# 本地搜索
npm install hexo-generator-searchdb --save
# 地图生成
npm install hexo-generator-sitemap --save

错误

​ 在升级的过程中出现雷士下面的错误,找了半天都没有很好地解决,一开始猜测是主题修改的问题在新建的干净环境中还是存在一样的问题就,认为是文章的,虽说文章不多但还是花了点时间来找到对应的2篇,其原因在于

​ 可能有大括号之类或是格式不正确,如图片是[]()漏了某一个符号就报错了,hexo也没有指明哪一篇文章的错误这点相当的坑.也是很奇怪昨天写的文章都可以正常的发布,但今天居然找到的是两篇之前很久的文章,蜜汁操作.

问题原因:文章中谋篇可能有大括号之类或是格式不正确,如图片是[]()漏了某一个符号

1
2
3
4
5
6
7
8
9
10
11
12
13
14
15
16
17
18
19
20
21
22
23
24
25
26
27
28
29
30
31
32
33
34
35
36
37
38
39
TypeError [ERR_INVALID_URL]: Invalid URL: http://host:port/jsonrpc
at onParseError (internal/url.js:243:9)
at new URL (internal/url.js:319:5)
at D:\wwwroot\nobige\node_modules\hexo-util\lib\is_external_link.js:21:18
at Cache.apply (D:\wwwroot\nobige\node_modules\hexo-util\lib\cache.js:27:46)
at isExternalLink (D:\wwwroot\nobige\node_modules\hexo-util\lib\is_external_
link.js:19:16)
at D:\wwwroot\nobige\node_modules\hexo\lib\plugins\filter\after_render\exter
nal_link.js:23:35
at String.replace (<anonymous>)
at Hexo.externalLinkFilter (D:\wwwroot\nobige\node_modules\hexo\lib\plugins\
filter\after_render\external_link.js:22:15)
at Hexo.tryCatcher (D:\wwwroot\nobige\node_modules\bluebird\js\release\util.
js:16:23)
at Hexo.<anonymous> (D:\wwwroot\nobige\node_modules\bluebird\js\release\meth
od.js:15:34)
at D:\wwwroot\nobige\node_modules\hexo\lib\extend\filter.js:62:52
at tryCatcher (D:\wwwroot\nobige\node_modules\bluebird\js\release\util.js:16
:23)
at Object.gotValue (D:\wwwroot\nobige\node_modules\bluebird\js\release\reduc
e.js:166:18)
at Object.gotAccum (D:\wwwroot\nobige\node_modules\bluebird\js\release\reduc
e.js:155:25)
at Object.tryCatcher (D:\wwwroot\nobige\node_modules\bluebird\js\release\uti
l.js:16:23)
at Promise._settlePromiseFromHandler (D:\wwwroot\nobige\node_modules\bluebir
d\js\release\promise.js:547:31)
at Promise._settlePromise (D:\wwwroot\nobige\node_modules\bluebird\js\releas
e\promise.js:604:18)
at Promise._settlePromiseCtx (D:\wwwroot\nobige\node_modules\bluebird\js\rel
ease\promise.js:641:10)
at _drainQueueStep (D:\wwwroot\nobige\node_modules\bluebird\js\release\async
.js:97:12)
at _drainQueue (D:\wwwroot\nobige\node_modules\bluebird\js\release\async.js:
86:9)
at Async._drainQueues (D:\wwwroot\nobige\node_modules\bluebird\js\release\as
ync.js:102:5)
at Immediate.Async.drainQueues [as _onImmediate] (D:\wwwroot\nobige\node_mod
ules\bluebird\js\release\async.js:15:14)

参考

文档

汉语拼音书写格式(四线三格)及笔顺.doc

汉语拼音书写格式(四线三格)及笔顺.doc

自己整理汉语拼音字母表卡片-读音(A4直接打印).doc

自己整理汉语拼音字母表卡片-读音(A4直接打印).doc

拼音字母及音序表四线格大小写书写规范-excel版.xls

拼音字母及音序表四线格大小写书写规范-excel版.xls

汉语拼音四线三格线空白页.doc

汉语拼音四线三格线空白页.doc

一年级全部生写汉字高清字帖

一年级全部生写汉字高清字帖

软件

office文件批量打印2.0——Office批量打印精灵_by无痕

1
2
3
1.支持Excel格式:xls,xlsx;
2.支持Powerpoint格式:ppt,pps,pot,pptx;
3.支持Word格式:doc,vri,wps,rtf,txt,text,docx。

Office批量打印精灵

office文件批量打印4.0——Office批量打印精灵_by无痕

1
2
3
4
5
支持Word格式:.docx、.docm、.doc、.dotx、.dotm、.dot、.rtf、.txt、.wps 等;
支持Excel格式:.xlsx、.xlsm、.xlsb、.xlam、.xltx、.xltm、.xls、.xla、.xlt、.xlm、.xlw、.csv 等;
支持PowerPoint格式:.pptx、.ppt、.pptm、.ppsx、.pps、.ppsm、.potx、.pot、.potm、.odp 等;
支持PDF格式;
支持图片格式:.bmp、.gif、.jpeg、.png、.tiff 等。

Office批量打印精灵

百度文库源文件免费下载

巴法文库下载,打开网站,关注公众号,回复文库即可获得账号和网址

SSH工具

1
2
3
4
5
6
7
8
9
10
11
12
13
14
15
16
17
18
19
20
# FinalShell 
# FinalShell是一体化的的服务器,网络管理软件,不仅是ssh客户端,
# 还是功能强大的开发,运维工具,充分满足开发,运维需求.
#
# 特色功能:
# 免费海外服务器远程桌面加速,ssh加速,本地化命令输入框,支持自动补全,命令历史,自定义命令参数
#
# Windows版下载地址:
# http://www.hostbuf.com/downloads/finalshell_install.exe
#
# macOS版下载地址:
# http://www.hostbuf.com/downloads/finalshell_install.pkg
#
# mac版安装路径
# /Applications/FinalShell.app/Contents/Java/
# 配置文件路径
# /Users/$USER/Library/FinalShell/

# xshell5
# https://f.tiiao.cn/soft/exe/xshell/

Aria2

1
wget https://raw.githubusercontent.com/P3TERX/aria2.sh/master/aria2.sh && bash aria2.sh

lnmp一键安装包

1
2
3
4
wget http://soft.vpser.net/lnmp/lnmp1.7beta.tar.gz -cO lnmp1.7beta.tar.gz && tar zxf lnmp1.7beta.tar.gz && cd lnmp1.7

# 无人值守参数生成 https://lnmp.org/auto.html
wget http://soft.vpser.net/lnmp/lnmp1.6.tar.gz -cO lnmp1.6.tar.gz && tar zxf lnmp1.6.tar.gz && cd lnmp1.6 && LNMP_Auto="y" DBSelect="2" DB_Root_Password="lnmp.org" InstallInnodb="y" PHPSelect="5" SelectMalloc="1" ./install.sh lnmp

Screen

1
2
3
4
5
6
7
8
9
10
11
12
13
14
15
16
17
18
19
20
21
22
23
24
25
26
27
28
29
30
31
#https://www.runoob.com/linux/linux-comm-screen.html
#Linux screen命令用于多重视窗管理程序。
#screen为多重视窗管理程序。此处所谓的视窗,是指一个全屏幕的文字模式画面。
#通常只有在使用telnet登入主机或是使用老式的终端机时,才有可能用到screen程序。
#语法
#screen [-AmRvx -ls -wipe][-d <作业名称>][-h <行数>]
#[-r <作业名称>][-s <shell>][-S <作业名称>]
#参数说明:
#
#-A  将所有的视窗都调整为目前终端机的大小。
#-d<作业名称>  将指定的screen作业离线。
#-h<行数>  指定视窗的缓冲区行数。
#-m  即使目前已在作业中的screen作业,仍强制建立新的screen作业。
#-r<作业名称>  恢复离线的screen作业。
#-R  先试图恢复离线的作业。若找不到离线的作业,即建立新的screen作业。
#-s<shell>  指定建立新视窗时,所要执行的shell。
#-S<作业名称>  指定screen作业的名称。
#-v  显示版本信息。
#-x  恢复之前离线的screen作业。
#-ls或--list  显示目前所有的screen作业。
#-wipe  检查目前所有的screen作业,并删除已经无法使用的screen作业。
#
# 如果提示screen: command not found 命令不存在可以执行:
yum install screen
#或 apt-get install
# 创建
screen -S t1
# 挂起,后台运行
ctrl+a d
# 恢复指定窗口,后台到前台
screen -r t1

Rclone

1
2
3
4
5
6
7
8
9
10
11
12
13
14
15
16
17
18
19
20
21
22
23
24
25
26
27
28
29
30
31
32
33
34
35
yum -y update
# 安装依赖
yum install fuse fuse-devel -y
curl https://rclone.org/install.sh | sudo bash
# 创建配置文件
rclone config
# 查看配置文件路径
rclone config file
# 更多操作或帮助 https://rclone.org/docs/
# 设置开机自启:
systemctl enable rclone
# 重启:
systemctl restart rclone
# 停止:
systemctl stop rclone
# 状态:
systemctl status rclone
# 查看挂载
df -h
# 卸载磁盘
fusermount -qzu LocalFolder
# 挂载网盘,googleDrive 为你配置文件取的名称,/test为要挂载目录,可以整个网盘/
#, /home/00 为本地挂载路径
/usr/bin/rclone mount googleDrive:/test /home/00 \
--umask 0000 \
--default-permissions \
--allow-non-empty \
--allow-other \
--buffer-size 32M \
--dir-cache-time 12h \
--vfs-read-chunk-size 64M \
--vfs-read-chunk-size-limit 1G

# 注意挂载的路径,如/root/test 则某些软件可能无法正确的读取!
# 如果出现挂载后崩溃或是软件退出,可以尝试增加虚拟内存

虚拟内存

1
2
3
4
5
6
7
8
9
10
11
12
13
14
15
16
17
18
19
20
21
22
23
# https://www.moerats.com/archives/722/
#Linux VPS一键添加/删除Swap虚拟内存
#脚本不支持OpenVZ架构,安装会自动退出。
#然后根据选项进行操作,记得添加swap的时候填写纯数字,默认单位为M。
wget https://www.moerats.com/usr/shell/swap.sh && bash swap.sh

#———————————————————————————————————————
#Linux VPS一键添加/删除swap脚本
#1、添加swap
#2、删除swap
#———————————————————————————————————————
#请输入数字 [1-2]:1
#请输入需要添加的swap,建议为内存的2倍!
#请输入swap数值:2048
#swapfile未发现,正在为其创建swapfile
#Setting up swapspace version 1, size = 2097148 KiB
#no label, UUID=e556830d-aa98-41cf-b8a5-14dad33a144d
#swap创建成功,并查看信息:
#Filename Type Size Used Priority
#/swapfile file 2097148 0 -1
#SwapCached: 0 kB
#SwapTotal: 2097148 kB
#SwapFree: 2097148 kB

多媒体

1
2
3
4
5
6
7
8
9
10
11
12
13
14
15
16
17
18
19
20
21
22
23
24
25
26
27
28
29
30
31
32
33
34
35
36
37
# emby
# https://emby.media/linux-server.html
yum install https://github.com/MediaBrowser/Emby.Releases/releases/download/4.4.0.40/emby-server-rpm_4.4.0.40_x86_64.rpm
# 安装完后打开 http://localhost:8096

# 重启、开启、状态、停止命令
/usr/sbin/service emby-server restart
/usr/sbin/service emby-server start
/usr/sbin/service emby-server status
/usr/sbin/service emby-server stop

# plex
# https://www.plex.tv/zh/media-server-downloads/#plex-media-server
yum install https://downloads.plex.tv/plex-media-server-new/1.18.9.2578-513b381af/redhat/plexmediaserver-1.18.9.2578-513b381af.x86_64.rpm
#设置Plex开机启动
systemctl enable plexmediaserver.service
systemctl start plexmediaserver.service
#检查运行状态。
systemctl status plexmediaserver
# 需要开放的端口
# TCP:32400
# TCP:3005
# TCP:8324
# TCP:32469
# UDP:1900
# UDP:32410
# UDP:32412
# UDP:32413
# UDP:32414
# UDP:5353

# 启动、停止、重启命令
service plexmediaserver start
service plexmediaserver stop
service plexmediaserver restart
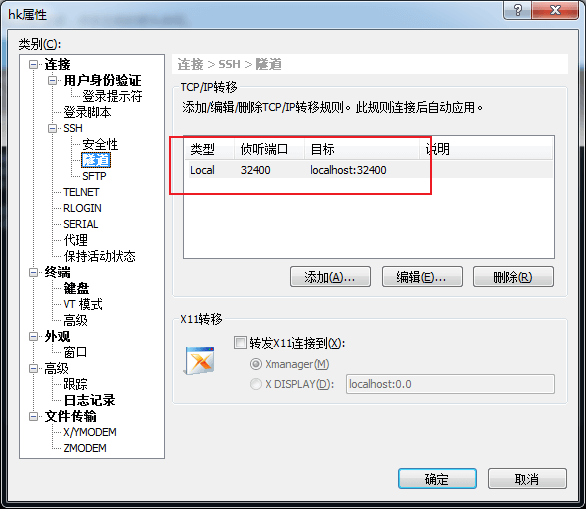
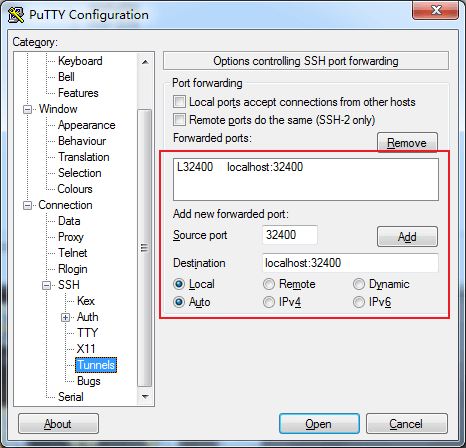
# 第一次访问需要内网打开 localhost:32400/web 完成安装的操作
# 可以通过Xshell或putty进行端口映射完成

Nginx

1
2
3
4
5
6
7
8
9
10
11
12
13
14
15
16
17
18
19
20
21
22
23
24
25
26
27
28
29
30
31
32
33
34
35
36
37
38
39
40
41
42
43
44
45
46
47
48
49
50
51
52
53
54
55
56
57
58
59
60
61
62
63
64
65
66
67
68
69
70
71
# 安装 EPEL
yum install epel-release
# 安装
yum install nginx
# 卸载
yum remove nginx
# 启动服务
sudo systemctl start nginx

# 检查 Nginx 的运行状态:
sudo systemctl status nginx

# 检查 Nginx 配置
nginx -t

# 设置开机启动
sudo systemctl enable nginx
# 关闭开机启动 Nginx
sudo systemctl disable nginx

# 停止服务
sudo systemctl stop nginx
# 重启服务
sudo systemctl restart nginx
# 重新加载
sudo systemctl reload nginx

# 开启目录浏览
autoindex on;
# 默认为on,显示出文件的确切大小,单位是bytes
# 显示出文件的大概大小,单位是kB或者MB或者GB
autoindex_exact_size off;
# 默认为off,显示的文件时间为GMT时间。
# 改为on后,显示的文件时间为文件的服务器时间
autoindex_localtime on;
# 让浏览器不保存临时文件
add_header Cache-Control no-store;
# 避免中文乱码
charset utf-8,gbk;
# 希望请求文件是下载而不是显示内容
add_header Content-Disposition attachment;

# 查看 nginx 服务进程
ps -ef | grep nginx
# 重新加载,因为一般重新配置之后,不希望重启服务,这时可以使用重新加载。
sudo systemctl reload nginx

#Nginx 的配置文件和最佳实践
#所有相关的配置文件都在 /etc/nginx/ 目录中。
#Nginx 的主配置文件是 /etc/nginx/nginx.conf。
#为了使 Nginx 配置更易于维护,建议为每个服务(域名)创建一个单独的配置文件。
#每一个独立的 Nginx 服务配置文件都必须以 .conf 结尾,并存储在 /etc/nginx/conf.d 目录中。
#您可以根据需求,创建任意多个独立的配置文件。
#
#独立的配置文件,建议遵循以下命名约定,比如你的域名是 domain.com,那么你的配置文件的应该是这样的
#/etc/nginx/conf.d/domain.com.conf,如果你在一个服务器中部署多个服务,
#当然你也可以在文件名中加上 Nginx 转发的端口号,比如 domain.com.3000.conf,这样做看起来会更加友好。
#
#如果你的配置中有很多重复的代码,那么建议你创建一个 /etc/nginx/snippets 文件夹,
#在这里面存放所有会被复用的代码块,然后在各个需要用到的 Nginx 的配置文件中引用进去,
#这样可以更方便管理和修改。
#
#Nginx 日志文件(access.log 和 error.log )位于 /var/log/nginx/ 目录中。
#建议为每个独立的服务配置不同的访问权限和错误日志文件,这样查找错误时,会更加方便快捷。
#你可以将要部署的代码文件,存储在任何你想的位置,但是一般推荐存放在下列位置中的其中一个:
#
#/home/<user_name>/<site_name>
#/var/www/<site_name>
#/var/www/html/<site_name>
#/opt/<site_name>
#/usr/share/nginx/html

Nginx配置

1
2
3
4
5
6
7
8
9
10
11
12
13
14
15
16
17
18
19
server {
listen 10808;
server_name us-nat.tiiao.cn us-nat.tiiao.cn;
location / {
root /var/www/main;
autoindex on;
autoindex_exact_size off;
autoindex_localtime on;
charset utf-8,gbk;
}
location /d {
root /usr/share/nginx/html/d;
autoindex on;
autoindex_exact_size off;
autoindex_localtime on;
charset utf-8,gbk;
}

}

Caddy

1
2
3
4
5
6
7
8
9
10
11
12
13
# Caddy 配置文件路径:/etc/caddy/Caddyfile
# 启动
sudo systemctl start caddy.service
# 重启
sudo systemctl restart caddy.service
# 重启
sudo systemctl stop caddy.service
# 查看
sudo systemctl status caddy.service
# 开机启动
sudo systemctl enable caddy.service


Caddy配置

1
2
3
4
5
6
7
8
9
10
11
12
13
14
15
16
17
18
19
20
21
22
23
24
25
26
27
28
29
30
31
# https://caddyserver.com/docs/
# 配置文件路径 /etc/caddy/Caddyfile
# 开启目录浏览,gzip
down.nobige.cn{
root /var/www/main
gzip
browse
}

railgun.moe {
gzip
log /var/log/caddy/railgun_moe.log
tls lengz@lengzzz.com
root /var/www/
header /api {
Access-Control-Allow-Origin *
Access-Control-Allow-Methods "GET, POST, OPTIONS"
-Server
}
fastcgi / 127.0.0.1:9000 php {
index index.php
}
rewrite {
to {path} {path}/ /index.php?{query}
}
}
lengzzz.com {
tls lengz@lengzzz.com
log /var/log/caddy/lengzzz_com.log
redir / https://railgun.moe/{uri} 301
}

yum源

1
2
3
4
5
6
7
8
9
10
11
12
13
14
15
16
17
18
19
20
21
22
23
24
25
26
27
28
29
30
31
32
33
34
35
36
37
38
39
40
# 备份yum源
cd /etc/yum.repos.d/
mv CentOS-Base.repo CentOS-Base.repo_bak
# 阿里云yum源:
# centos7
wget -O /etc/yum.repos.d/CentOS-Base.repo http://mirrors.aliyun.com/repo/Centos-7.repo

# centos6
wget -O /etc/yum.repos.d/CentOS-Base.repo http://mirrors.aliyun.com/repo/Centos-6.repo

# contos5
wget -O /etc/yum.repos.d/CentOS-Base.repo http://mirrors.aliyun.com/repo/Centos-5.repo

# 网易yum源:
# centos7
wget -O /etc/yum.repos.d/CentOS-Base.repo http://mirrors.163.com/.help/CentOS7-Base-163.repo

# centos6
wget -O /etc/yum.repos.d/CentOS-Base.repo http://mirrors.163.com/.help/CentOS6-Base-163.repo

# contos5
wget -O /etc/yum.repos.d/CentOS-Base.repo http://mirrors.163.com/.help/CentOS5-Base-163.repo

# 中科大yum源:
# centos7
wget -O /etc/yum.repos.d/CentOS-Base.repo https://lug.ustc.edu.cn/wiki/_export/code/mirrors/help/centos?codeblock=3

# centos6
wget -O /etc/yum.repos.d/CentOS-Base.repo https://lug.ustc.edu.cn/wiki/_export/code/mirrors/help/centos?codeblock=2

# contos5
wget -O /etc/yum.repos.d/CentOS-Base.repo https://lug.ustc.edu.cn/wiki/_export/code/mirrors/help/centos?codeblock=1

epel源:
yum -y install epel-release

# 更新元数据,先清除原来的元数据缓存
sudo yum clean all
# 更新新的元数据缓存
sudo yum makecache

神奇的脚本

1
2
3
4
5
6
7
8
9
10
11
12
13
14
15
16
17
18
19
20
21
22
23
24
25
26
27
28
29
30
31
32
33
34
35
36
# https://github.com/233boy/v2ray/wiki
bash <(curl -s -L https://git.io/v2ray.sh)

# https://github.com/ToyoDAdoubi/doubi
wget -N --no-check-certificate https://raw.githubusercontent.com/ToyoDAdoubi/doubi/master/ssr.sh && chmod +x ssr.sh && bash ssr.sh

# 安装 4合1 bbr 锐速安装脚本
wget -N --no-check-certificate "https://raw.githubusercontent.com/ylx2016/Linux-NetSpeed/master/tcp.sh" && chmod +x tcp.sh && ./tcp.sh

# https://github.com/wulabing/V2Ray_ws-tls_bash_onekey
wget -N --no-check-certificate -q -O install.sh "https://raw.githubusercontent.com/wulabing/V2Ray_ws-tls_bash_onekey/master/install.sh" && chmod +x install.sh && bash install.sh


# 南琴浪版暴力魔改BBR一键安装脚本
# https://github.com/tcp-nanqinlang/wiki/wiki/general
# Debian版:
wget --no-check-certificate https://github.com/tcp-nanqinlang/general/releases/download/3.4.2.1/tcp_nanqinlang-fool-1.3.0.sh
bash tcp_nanqinlang-fool-1.3.0.sh

# CentOS版:
wget --no-check-certificate https://raw.githubusercontent.com/tcp-nanqinlang/general/master/General/CentOS/bash/tcp_nanqinlang-1.3.2.sh
bash tcp_nanqinlang-1.3.2.sh
#根据步骤走,安装完内核后重启
shutdown -r now
# 南琴浪版暴力魔改BBR一键安装脚本-end

# https://github.com/ellermister/mtproxy
mkdir /home/mtproxy && cd /home/mtproxy
curl -s -o mtproxy.sh https://raw.githubusercontent.com/ellermister/mtproxy/master/mtproxy.sh && chmod +x mtproxy.sh && bash mtproxy.sh

# 网速测试
# https://bench.sh/
# 你可以使用以下命令来查看您的 Linux 系统信息,还可以测试网络带宽及硬盘读写速率
wget -qO- bench.sh | bash
# 或者
curl -Lso- bench.sh | bash

SELinux

1
2
3
setenforce 0 # 临时生效可以直接用setenforce 0 
# 1 启用
# 0 告警 不启用

方法

端口查询

1
2
3
netstat -ntlp   //查看当前所有tcp端口
netstat -ntulp | grep 80 //查看所有80端口使用情况
netstat -ntulp | grep 3306 //查看所有3306端口使用情况

目录浏览

nginx[宝塔]开启目录浏览模式(nginx autoindex)

在网站 设置 伪静态里边设置如下

1
2
3
4
autoindex on;
autoindex_exact_size off;
autoindex_localtime on;
charset utf-8,gbk;

端口映射

Xshell

Xshell

putty

putty

mount的基本用法

1
2
3
4
5
6
7
8
9
10
11
12
13
14
15
16
17
# https://wangchujiang.com/linux-command/c/mount.html
# mount命令 Linux mount命令是经常会使用到的命令,它用于挂载Linux系统外的文件。
# 格式:mount [-参数] [设备名称] [挂载点]
# 其中常用的参数有:
# -a 安装在/etc/fstab文件中类出的所有文件系统
# -f 伪装mount,作出检查设备和目录的样子,但并不真正挂载文件系统。
# -n 不把安装记录在/etc/mtab 文件中
# -r 讲文件系统安装为只读
# -v 详细显示安装信息
# -w 将文件系统安装为可写,为命令默认情况。
# -t <文件系统类型> 指定设备的文件系统类型
# msdos MS-DOS的fat,就是fat16
# vfat windows98常用的fat32
# nfs 网络文件系统
# iso9660 CD-ROM光盘标准文件系统
# ntfs windows NT/2000/XP的文件系统
# auto 自动检测文件系统

防火墙

1
2
3
4
5
6
7
8
9
10
11
12
13
14
15
16
17
18
19
20
21
22
23
24
25
26
# 永久的开放需要的端口

sudo firewall-cmd --zone=public --add-port=6800/tcp --permanent
sudo firewall-cmd --zone=public --add-port=80/tcp --permanent
sudo firewall-cmd --reload

# 临时关闭防火墙,重启后会重新自动打开
systemctl restart firewalld

# 检查防火墙状态
firewall-cmd --state
firewall-cmd --list-all

# Disable firewall
systemctl disable firewalld
systemctl stop firewalld
systemctl status firewalld

# Enable firewall
systemctl enable firewalld
systemctl start firewalld
systemctl status firewalld

# ————————————————
# 日期:2021-01-15
# 参考链接:https://www.jianshu.com/p/bad33004bb4f

生成测试文件

1
2
3
4
5
6
7
8
9
10
11
12
13
14
15
#32M
dd if=/dev/zero of=32M.bin bs=1M count=32 conv=fdatasync
#64M
dd if=/dev/zero of=64M.bin bs=1M count=64 conv=fdatasync
#128M
dd if=/dev/zero of=128M.bin bs=1M count=128 conv=fdatasync
#256M
dd if=/dev/zero of=256M.bin bs=1M count=256 conv=fdatasync
#512M
dd if=/dev/zero of=512M.bin bs=1M count=512 conv=fdatasync
#1GB
dd if=/dev/zero of=1024M.bin bs=1M count=1024 conv=fdatasync
# ————————————————
# 日期:2021-01-18
# 参考链接:https://www.runoob.com/linux/linux-comm-dd.html

错误

-bash: wget: command not found

解决:yum -y install wget

Try ‘chmod –help’ for more information.

解决:chmod +x xx.sh或是bash xx.sh

None of the supported tools for extracting zip archives (unzip 7z busybox) were found. Please install one of them and try agai

解决:yum install -y unzip

The nameserver prefix is invalid.

解决:只填NS Prefix前缀,不填.com域名之类,随意填写一些任意单词字母

umount 时出现的 “Device is busy”

umount, 老是提示:device is busy, 服务又不能停止的。

解决:用”umount -fl”解决

mount error(13): Permission denied

1
2
3
4
# 原
mount.cifs //192.168.123.13/dwonload /home/download/ --verbose -o username=root,password=root,iocharset=utf8,uid=0,gid=0
# 添加sec=ntlmssp
mount.cifs //192.168.123.13/dwonload /home/download/ --verbose -o username=root,password=root,sec=ntlmssp,iocharset=utf8,uid=0,gid=0

-bash: netstat: command not found

1
yum install -y net-tools

No package nginx available.

1
2
3
4
5
6
7
8
9
10
11
12
13
14
15
16
17
18
19
20
21
22
23
24
25
26
27
28
29
# 1、备份原来的 CentOS-Base.repo
mv /etc/yum.repos.d/CentOS-Base.repo /etc/yum.repos.d/CentOS-Base.repo.bak

# 2、下载新的 CentOS-Base.repo 到 / etc/yum.repos.d/

####centos 6版本
wget -O /etc/yum.repos.d/CentOS-Base.repo http://mirrors.aliyun.com/repo/Centos-6.repo

####centos 7版本
wget -O /etc/yum.repos.d/CentOS-Base.repo http://mirrors.aliyun.com/repo/Centos-7.repo

####centos 8版本
wget -O /etc/yum.repos.d/CentOS-Base.repo http://mirrors.aliyun.com/repo/Centos-8.repo

# 3、运行
yum makecache

# 作用:就是把服务器的包信息下载到本地电脑缓存起来,makecache 建立一个缓存,以后用 install 时就在缓存中搜索,提高了速度。

# 4、安装 epel 源

yum -y install epel-release

# 5、安装 NGINX 服务

yum -y install nginx
# ————————————————
# 日期:2020-12-01
# 参考链接:https://blog.csdn.net/l_liangkk/article/details/105003088

Nginx目录列表 403 无法显示

  1. 权限问题,可以尝试添加权限解决问题,即 chmod -R 755 /var/www/main 修改这个目录或者权限和其他目录
  2. SELinux策略问题,可以通过sestatus查看SELinux是否有开启,用sudo setenforce 0可以临时关闭SELinux模式,用vim /etc/selinux/config将SELINUX=enforcing改为SELINUX=disabled永可以永久关闭,具体详细可以Google一下,你就知道。
  3. 用户权限问题,vim /etc/nginx/nginx.conf 修改user 用户名改为user root

参考

snake

Photo by Austin Lowman on Unsplash

读写文件编码问题

UnicodeDecodeError: ‘gbk’ codec can’t decode byte 0xae in position 553: illegal multibyte sequence

解决,添加指定编码

1
2
3
4
5
6
7
8
9
10
# 原
with open(filename, mode = 'r') as f:
for line in f:
print(repr(line))


# 修改
with open(filename, encoding='utf-8', mode = 'r') as f:
for line in f:
print(repr(line))

参考:UnicodeDecodeError: ‘gbk’ codec can’t decode byte 0xaa in position 553: illegal multibyte sequence · Issue #37 · rkern/line_profiler

YAML.load错误

YAMLLoadWarning: calling yaml.load() without Loader=… is deprecated, as the default Loader is unsafe. Please read https://msg.pyyaml.org/load for full details.

1
2
3
4
# 原
yaml.load(input)
# 修改
yaml.load(input, Loader=yaml.FullLoader)

参考:yaml.load()时总是出现警告:YAMLLoadWarning: calling yaml.load() without Loader=…_网络_如果没有梦想,那跟咸鱼有什么分别-CSDN博客

YAML模块找不到

ModuleNotFoundError: No module named ‘yaml’

解决,pip install pyyaml

参考:ModuleNotFoundError: No module named ‘yaml’ · Issue #291 · yaml/pyyaml

base64

a bytes-like object is required, not ‘str’

1
2
3
4
5
# 原
email['html'] = base64.b64encode(email.get('html'))

# 修改为
email['html'] = base64.b64encode(email.get('html').encode('utf-8')).decode('utf-8')

参考:TypeError: a bytes-like object is required, not ‘str’ (smtp_sen_email) · Issue #7 · sendpulse/sendpulse-rest-api-python

str转dict/如何将字符串转换成字典dict类型

1
2
import json
temp = json.loads(str)

Mysql-Python

安装Mysql数据库

1.pip install Mysql-Python

1
2
3
building '_mysql' extension
error: Microsoft Visual C++ 14.0 is required. Get it with "Microsoft Visual
C++ Build Tools": http://landinghub.visualstudio.com/visual-cpp-build-tools

问题:python很多包都是通过C或C++写的,因此需要C++编译工具,

解决:安装C++编译或安装最新版的Visual Studio或是安装已经编译好的包

Mysql则需要安装mysql-python和mysqlclient

1
2
3
4
5
# mysql-python
https://www.lfd.uci.edu/~gohlke/pythonlibs/#mysql-python
# mysqlclient
https://www.lfd.uci.edu/~gohlke/pythonlibs/#mysqlclient

mysql-python

根据系统版本下载win_amd64或win32位的编译包,使用pip安装#

1
2
3
4
5
6
7
8
9
10
11
12
13
14
15
16
17
18
19
20
21
pip install MySQL_python-1.2.5-cp27-none-win_amd64.whl
# 如果出现下面错误
ERROR: MySQL_python-1.2.5-cp27-none-win32.whl is not a supported wheel on this p
latform.
# 通过修改文件名来实现安装,文件名则根据Python版本进行修改,如我的版本是3.7
# 将
MySQL_python-1.2.5-cp27-none-win_amd64.whl
# 改成
MySQL_python-1.2.5-cp37-none-win_amd64.whl
# 即可
D:\Users\Administrator\Desktop\testss>python -V
Python 3.7.0
# D:\testss>python -V
Python 3.7.0

# D:\testss>pip install D:\testss\mysqlclient-1.4.6-cp37-cp37m-win_amd64.whl
Looking in indexes: https://pypi.tuna.tsinghua.edu.cn/simple
Processing d:\testss\mysqlclient-1.4.6-cp37-cp37m-win_amd64.whl
Installing collected packages: mysqlclient
Successfully installed mysqlclient-1.4.6

改名

ip2Region报错 Index pointer not found

环境,Windows7,python3.7.0,ip2Region2.2.0,Flask1.1.0

情况,使用默认b-tree算法,配合Flask,第一次出现正常结果,刷新后则出现Index pointer not found,指针错误

原因,Flask生命周期或是其他原因导致ip2Region被关闭,(即使没有写searcher.close())

解决,更换其他算法即可,如binarySearch算法或是memory算法,如下

1
2
3
4
5
6
7
8
9
10
# 更换算法
algorithm = "memory"
searcher = Ip2Region(dbFile)
try:
# 算法使用的方法也要更换,如memorySearch,binarySearch
data = searcher.memorySearch(ip)
except Exception as e:
print(e)
# 跟换其他算法后关不关闭都不影响二次使用
searcher.close()

Flask

1
2
3
4
5
6
7
8
9
10
11
12
13
14
# 获取参数,get,post
# POST
request.form['username']

# GET
request.args.get('key', '')

# 自定义404错误,500等错误异常界面
@app.errorhandler(404)
def page_not_found(error):
return render_template('404.html'), 404

————————————————
参考链接:https://flask.palletsprojects.com/en/1.1.x/quickstart/#redirects-and-errors

三目运算

python中的三元表达式(三目运算符)
x = "变量1" if a>b else "变量2"

编码

Non-UTF-8 code starting with ‘\xe5’ in file

1
2
3
4
5
6
运行出现	Non-UTF-8 code starting with '\xe5' in file
解决,头部添加
# coding=utf8

————————————————
参考链接:https://stackoverflow.com/questions/23092176/syntaxerror-non-utf-8-code-starting-with-x91

环境变量

‘pip’ 不是内部或外部命令,也不是可运行的程序

解:[python3以上适用] 将python目录下的Scripts添加到环境变量,如下目录

1
C:\Users\Administrator\AppData\Local\Programs\Python\Python37\Scripts

‘python’ 不是内部或外部命令,也不是可运行的程序

解:将python目录添加到环境变量,如下目录

1
C:\Users\Administrator\AppData\Local\Programs\Python\Python37\

str 与 bytes 之间的转换

1
2
3
4
5
6
7
8
9
10
11
12
13
14
15
16
17
18
19
20
21
# bytes object
b = b"example"

# str object
s = "example"

# str to bytes
bytes(s, encoding = "utf8")

# bytes to str
str(b, encoding = "utf-8")

# an alternative method
# str to bytes
str.encode(s)

# bytes to str
bytes.decode(b)
# ————————————————
# 日期:2020/12/11
# 参考链接:https://blog.csdn.net/yatere/article/details/6606316

Python获取数组列表下表

1
2
for i in range(len(list_a)):
print(list[i],i)

Python 命令行参数

1
2
3
4
5
6
7
8
9
10
11
python test.py arg1 arg2 arg3
Python 中也可以使用 sys 的 sys.argv 来获取命令行参数:

sys.argv 是命令行参数列表。

len(sys.argv) 是命令行参数个数。

注:sys.argv[0] 表示脚本名。
# ————————————————
# 日期:2021-02-21
# 参考链接:https://www.runoob.com/python/python-command-line-arguments.html

生成EXE

1
2
3
4
5
6
7
8
9
10
11
12
13
14
15
16
17
18
19
20
21
22
23
pip install pyinstaller
打包方法:
使用终端,进入工程所在文件夹,然后使用pyinstaller [opts] yourprogram.py命令
opts:
-F 指定打包后只生成一个exe格式的文件(建议写上这个参数)
-D –onedir 创建一个目录,包含exe文件,但会依赖很多文件(默认选项)
-c –console, –nowindowed 使用控制台,无界面(默认)
-w –windowed, –noconsole 使用窗口,无控制台
-p 添加搜索路径,让其找到对应的库。
-i 改变生成程序的icon图标
举例:
在你的D:\project下有个python程序叫test.py
同时你也在这个目录下放了一个你喜欢的hello.ico的ico图标文件
那么这个时候你就会愉快的利用终端敲下如下命令:
pyinstaller -F -i hello.ico test.py
以上命令打包出来的.exe运行时会弹出终端,如果不想要这个小黑框可加上 -w 命令,例如:
pyinstaller -F -i hello.ico test.py -w

命令运行结束后你惊奇发现,在D:\project多了pycache、build、dist三个文件夹和一个test.spec文件
这时你进到dist文件夹下,里面就有你的test.exe
# ————————————————
# 日期:2021-02-21
# 参考链接:https://www.jianshu.com/p/9718b35cc323

SQLite压缩清空回收站

压缩Sqlite数据文件大小,解决数据删除后占用空间不变的问题

1
2
3
4
5
6
7
8
9
10
11
12
13
14
15
16
17
18
19
20
21
VACUUM

VACUUM 命令通过复制主数据库中的内容到一个临时数据库文件,然后清空主数据库,并从副本中重新载入原始的数据库文件。这消除了空闲页,把表中的数据排列为连续的,另外会清理数据库文件结构。

如果表中没有明确的整型主键(INTEGER PRIMARY KEY),VACUUM 命令可能会改变表中条目的行 ID(ROWID)。VACUUM 命令只适用于主数据库,附加的数据库文件是不可能使用 VACUUM 命令。

如果有一个活动的事务,VACUUM 命令就会失败。VACUUM 命令是一个用于内存数据库的任何操作。由于 VACUUM 命令从头开始重新创建数据库文件,所以 VACUUM 也可以用于修改许多数据库特定的配置参数。
手动 VACUUM
下面是在命令提示符中对整个数据库发出 VACUUM 命令的语法:

$sqlite3 database_name "VACUUM;"
您也可以在 SQLite 提示符中运行 VACUUM,如下所示:

sqlite> VACUUM;
您也可以在特定的表上运行 VACUUM,如下所示:

sqlite> VACUUM table_name;
!!!一定概率破坏数据库文件完整性。
# ————————————————
# 日期:2021-02-21
# 参考链接:https://www.runoob.com/sqlite/sqlite-vacuum.html

pip

1
2
3
4
5
6
7
8
9
# 生成requirements.txt 文件
pip freeze > requirements.txt

# 安装到当前目录或指定目录
pip install -t ./ requests

# 读取requirements.txt文件并安装到当前目录或指定目录
pip install -r requirements.txt -t ./

文件是否存在

1
2
3
4
5
6
7
8
9
10
11
12
13
14
15
16
17
18
19
20
21
22
23
24
25
26
27
28
29
30
31
32
33
34
35
36
37
38
39
40
41
42
43
44
45
46
47
48
49
50
# 判断文件是否存在
import os
os.path.exists(test_file.txt)
#True

os.path.exists(no_exist_file.txt)
#False

# 判断文件夹是否存在
import os
os.path.exists(test_dir)
#True

os.path.exists(no_exist_dir)
#False

# 只检查文件
import os
os.path.isfile("test-data")
# 判断文件是否可做读写操作
# os.F_OK: 检查文件是否存在;
# os.R_OK: 检查文件是否可读;
# os.W_OK: 检查文件是否可以写入;
# os.X_OK: 检查文件是否可以执行
# 该方法通过判断文件路径是否存在和各种访问模式的权限返回True或者False。

import os
if os.access("/file/path/foo.txt", os.F_OK):
print "Given file path is exist."

if os.access("/file/path/foo.txt", os.R_OK):
print "File is accessible to read"

if os.access("/file/path/foo.txt", os.W_OK):
print "File is accessible to write"

if os.access("/file/path/foo.txt", os.X_OK):
print "File is accessible to execute"

#使用Python3版本中内建pathlib模块
#检查路径是否存在
path = pathlib.Path("path/file")
path.exist()

#检查路径是否是文件
path = pathlib.Path("path/file")
path.is_file()
# ————————————————
# 日期:2021-03-01
# 参考链接:https://www.cnblogs.com/jhao/p/7243043.html

是对象不是map

fastapi sqlalchemy

TypeError: ‘People’ object is not subscriptable

is not mapped

1
2
3
4
5
6
7
8
9
10
11
12
13
14
15
16
17
from fastapi import FastAPI
from pydantic import BaseModel

app = FastAPI()

class People(BaseModel):
name: str
age: int

@app.post('/insert')
def insert(people: People):
# 错误的使用
print(people['name'])
# 正确的使用
print(people.name)
msg = f'name:{people.name},age:{age}'
return {'success': True, 'msg': msg}

参考:

0%